Tool Palette
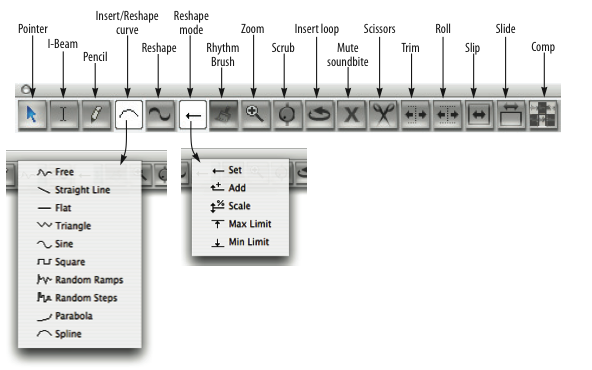
The tools in the Tool palette (Studio menu) are used for inserting, selecting, editing, reshaping, zooming, looping and scrubbing data in Digital Performer's various graphic and notation editing windows, including the MIDI Editor, Drum Editor, Notation Editor, QuickScribe Editor, Sequence Editor and Waveform Editor.
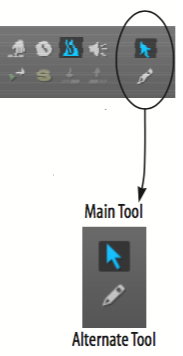
The Alternate Tool
By default, the Control Panel displays the Alternate Tool, which serves as a temporary alternative to the main tool and allows you to quickly switch between the main and alternate tools without needing to visit the Tool Palette. You can select the main and alternate tools by clicking the tool's icon, then choosing the desired tool from the menu that appears. To temporarily switch to the Alternate tool, hold down the X key.

If you want to see the full Tool Palette in the Control Panel, right-click on the control panel and select "Keep Tool Palette Visible when Displaying Editor Tools." To open the Tool Palette outside of the Consolidated Window, select Tools (Studio menu) or use the command Shift-O.

The Tool palette can be rotated to a vertical orientation by pressing Shift-Option-tilde (~). There are two preferences for the Tool palette that allow you to dock the Tool palette to the edge of edit windows, either vertically or horizontally. To close the Tool palette, click its close button.
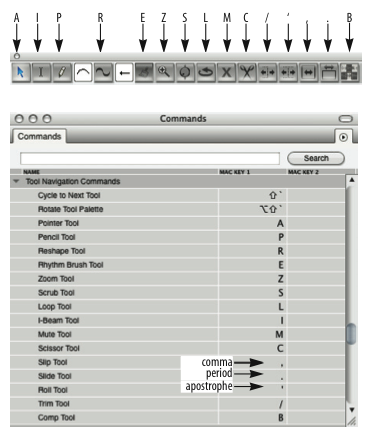
Hold down the following keys for tool selection:

If you double-tap the keys shown in the tool shortcuts shown above, the tool will remain selected until you select another tool.
The Tools
Pointer tool: The Pointer tool produces the standard "cross-hair" selection cursor for "marquee" selections over multiple data events and and "finger" selection cursor for selecting and editing individual data events. For example, you could select several bars of notes by positioning the cross-hair cursor over an empty portion of the data grid and dragging out a selection box over the desired data events.
I-Beam tool: The I-Beam tool allows you to make time range selections in any graphic editor, regardless of the material you are dragging over to make the selection. Time range selections in the Sequence Editor are much easier with this tool, especially when you are making selections that begin in the middle of soundbites. As usual, you can hold down the Shift key while using the I-Beam tool to extend or shorten the current selection. Shift-click other tracks to add them to the current selection without changing the start and end times. To make a time range selection that matches the duration of a soundbite or MIDI note, double-click the soundbite or note with the I-Beam. To temporarily get the I-Beam cursor when another tool is selected, hold down the I key.
Pencil tool: The Pencil tool lets you insert data. To insert a data event, click in a note grid or continuous data grid. To remove a MIDI note, click it on a MIDI note grid, to insert continuous data curve (MIDI or audio), click the master track button for the desired track, if any, click the Pencil tool, choose the desired shape from the in the Tool palette, choose the desired data type in the continuous data grid (or make it the active layer in the Sequence Editor) and then click or drag on the grid. To edit samples in the Waveform Editor, click them or drag over them. When inserting notes in the Drum Editor, the Drum Editor Tool Settings Pane shows the settings for inserting notes.
Insert/Reshape Curve: Controls the shape or curve of continuous data when you insert it with the Pencil tool or modify it with the Reshape tool.
Reshape tool: The Reshape tool lets you reshape a stream of continuous data. The techniques can be used in any continuous data grid, including volume editing mode for audio and MIDI tracks in the Sequence Editor.
Reshape Mode menus: Controls what happens to continuous data when you modify it with the Reshape tool. For example, you can scale, compress or limit it.
Rhythm Brush: The Rhythm Brush can only be used in the Drum Editor. (It is grayed out when another editor window is active.) The Rhythm Brush lets you quickly "paint" in drum parts in a wide variety of percussion instrument styles.
Zoom tool: The Zoom tool (magnifying glass) in the Tool palette lets you zoom in on a portion of a graphic editor by dragging a zoom box over it. Click to zoom in and Option-click to zoom out. In the time ruler or continuous data grid, drag horizontally to zoom the time axis only.
Scrub tool: The Scrub tool lets you scrub MIDI, audio and waveform data.
Loop tool: The Loop tool lets you graphically insert a loop in a track by dragging in the Sequence Editor or the Marker Strip of the MIDI Editor and Notation Editor. You can also insert a loop in the Sequence Editor by dragging directly over the portion of the track that you wish to loop. It also lets you insert a sampler loop in the Waveform Editor.
Mute tool: The Mute tool mutes and unmutes soundbites when you click them or drag over them in the Sequence Editor or Track Overview. The Mute tool only works when soundbites are the active layer in the track. Muting occurs independently of any volume automation in the track. Muted soundbites appear with a grayed-out waveform.
The Mute tool is a handy way to temporarily mute soundbites, but it is also great for arranging and creating interesting rhythm parts. Here's just one example: use the Scissors tool to split an ambient pad into a rhythmic grid of slivers (explained further in the next section) and then use the Mute tool to quickly create syncopated riffs by muting various combinations of the slivers. To temporarily get the Mute tool when another tool is selected, hold down the M key.
Scissors tool: The Scissors tool splits a MIDI note or soundbite where you click. With the edit grid turned on, you can also drag across a note or soundbite to split it repeatedly on grid lines. To temporarily get the Scissors tool when another tool is selected, hold down the C key.
The Scissor and Mute tools also have special functions when working with beats and pitch automation. Consult your Digital Performer user guide for more information.
Trim tool: The Trim tool allows you to click anywhere in a soundbite to move the right edge to the location where you clicked; hold down the Option key to move the left edge of a soundbite. The Trim tool can also trim continuous data by clicking directly on data points or a line segment. If there is a time range or object selection of continuous data, click near the selected data and drag up or down to scale the data, or hold the Option key to flatten the data. To temporarily get the Trim tool when another tool is selected, hold down the forward slash key (/).
Roll tool: The Roll tool allows you to edge edit the beginning of one soundbite and the end of another where they are abutted. They must be touching one another. To temporarily get the Roll tool when another tool is selected, hold down the apostrophe key (').
Slip tool: The Slip tool allows you to edge edit the start and end of a soundbite while the soundbite remains at the same position in the track. The soundbite's length does not change. To temporarily get the Slip tool when another tool is selected, hold down the comma key (,).
Slide tool: The Slide tool allows you to move a soundbite in the sequence while leaving the soundbite's audio at the same playback time. This is the same as edge editing both ends by the same amount forwards or backwards. To temporarily get the Slide tool when another tool is selected, hold down the period key (.).
Comp tool: The Comp tool allows you to create a composite, or "comp," take from multiple takes in an audio track. To temporarily get the Comp tool when another tool is selected, hold down the B key.