Selection Information
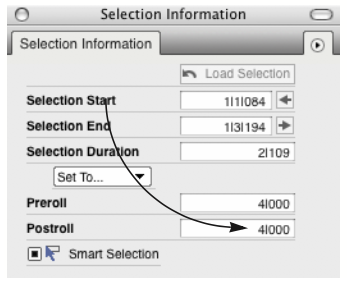
The Selection Information window holds the start and end times for any region that you wish to edit in any currently highlighted tracks. If the Digital Performer project file contains multiple chunks (sequences and/or songs), separate Selection Information is stored for each chunk.
You can set these times by:
- Making time range selection in an edit window
- Typing (use the Tab key as usual to move through the boxes)
- Dragging on the nunmbers vertically to change them
- Choosing the desired command from the Set To menu
- Using several clicking shortcuts
- Using several keyboard shortcuts
- Loading them with the Remember TImes command
Editing the selection bar numbers directly
To enter a start or end time, click in a field and enter avalue. You can use the Tab key (or decimal point key on the keypad) to cycle through the measure|beat|tick fields. Or you can simply press on any field and drag up or down to change its value.
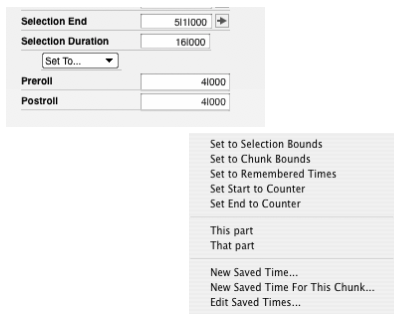
Using the Set To menu shortcuts
The Set To menu holds great shortcuts for loading times into the Selection Information window:
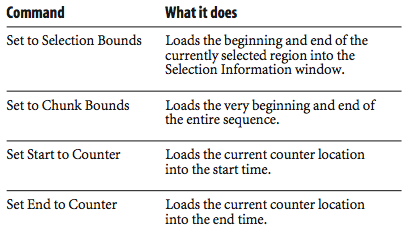
For the last two commands, Digital Performer loads the counter location at the time you click the menu, not when you actually choose the command. This helps you load start and end times on the fly during playback. Click the menu at the desired instant, and then take as much time as you need to choose either Set Start or Set End.
Clicking the start and end buttons
The buttons to the right of the Selection Start and Selection End values let you load times as follows:
- Click the button to load the current counter location - even on the fly during playback.
- Command/Ctrl-click the button to load the beginning or end of the sequence into ths the start or end time, respectively.
- Control/Win-click the button to load the beginning or end of the Remembered Times (previously retrieved from a selection with the Remembered Times command) into the start time or end time, respectively.
The selection bar shortcuts
There are two shortcuts for loading the current counter location into the Selection start and end times. By default, they are assigned to the F5 and F6 keys on your computer keyboard. You can change these key assignments if you like. You can also program key commands to respond to any MIDI device, so that you can actually load counter times from an external MIDI device. See the Commands window for more details.
The "Remember Times" command
The Remember Times command (Control-R) allows you to save any time range selection, so that you can load it into the Selection Information window later on. You can also load remembered times into the Memory Bar and the Auto-Record Bar.
Load Selection
The Load Selection button provides additional shortcuts. Click the Load Selection button once to Set Selection to Remembered Times, or double-click the button to Set Selection to Chunk Bounds.
Making a selection in an edit window
You can make a time range selection in an edit window to set the Selection times. For example, you could click one of the Memory Cycle markers in the MIDI Editor to select the Memory Cycle range. The selection is automatically loaded into the Selection Information window.
Preroll and Postroll
These text fields set the Preroll and Postroll for Link Playback to Memory mode. See the Control Panel for more information.
Smart Selections
A check box is provided as a convenient shortcut to enable or disable Smart Selections. For more information, see page 534 of the DP User Guide.