Mix Automation
Digital Performer's mixing environment offers complete automation of effects plug-in parameters, track muting/unmuting, effects send levels, send mutes/unmutes and more. The mix automation features in Digital Performer apply to both MIDI and audio tracks, except as noted below.
Mix automation in MIDI tracks
Only the following mix automation parameters can be automated in a MIDI track:
- Volume and pan
- Track mute/unmute
- Any form of MIDI continuous data
Digital Performer automates MIDI track volume and pan using MIDI controller data (#7 for volume and #10 for pan) to create sudden or smooth volume changes, crossfade effects and panning effects in MIDI tracks. MIDI volume controllers have a range from zero to 127. Unlike note-on velocities, which only affect the initial volume of the note, volume controllers affect volume at any time while a note is playing. Controllers can be inserted, generated, drawn, reshaped, recorded and otherwise handled using the Mixing Board, Sequence Editor and MIDI Editor.
Mix automation in audio tracks
Audio tracks can automate every mix parameter, including:
- Volume and pan
- Track mute/unmute
- Plug-in automation
- Plug-in bypass/unbypass
- All other mix parameters
- Pitch automation
- Soundbite volume
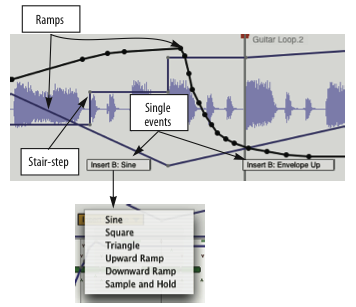
Digital Performer provides continuous break-point automation for all audio mixing parameters, including volume, pan, and plug-in parameters. Audio mix automation data can be inserted, generated, drawn and reshaped. Unlike MIDI events, which create discrete changes in MIDI volume, audio automation events actually calculate a smooth, sample-accurate ramp from one event to the next. This effect is often referred to as "ramp" automation because graphically, audio volume events produce lines that ramp from one event to the next. Several volume events can be used together to create volume curves, as demonstrated by the bottom track.
Mix automation setup
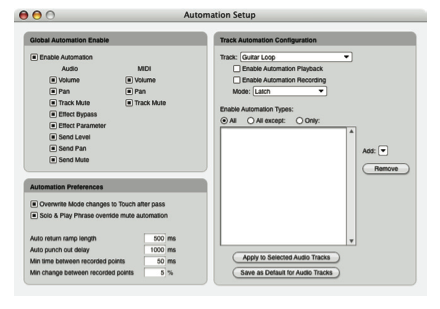
The Automation Setup window (Setup menu) provides dynamic control over automation, from a global level to the most detailed level in specific tracks. The Automation Setup window stays open so that you can easily access its features as you work.

Global automation enable/disable: As you work with automation, there will be times when you want to temporarily enable automation, and later re-enable it. Automation features can be enabled and disabled at any time on several levels:
- Globally (all automation)
- Globally by type of automation
- Per track
- Per individual effect parameters in a track
The global automation settings let you enable or disable automation altogether, or individually by several types of automation.
Enabling/disabling globally by data type: Similarly, the Global Automation section has individual enable/disable check boxes for categories of automation data (for both audio and MIDI tracks), including mute, volume, pan, send mutes, send levels, and plug-in effects parameters. For example, you might want to temporarily disable plug-in automation, while maintaining volume and pan automation.
Automation setup for each track: The Automation Setup window also provides independent automation settings for each track. You can enable/disable automation recording, playback, and even individual plug-in parameters. In addition, you can choose one of the different automation recording modes. For convenience, some of these settings are duplicated in each track's channel strip in the Mixing Board, as well as the track settings section in the Sequence Editor.
The track menu: Use this menu to choose the track for which you wish to make automation settings. All of the settings below this menu apply to the track currently chosen in the menu.
Enable automation playback: Check this box to enable automation during playback. Uncheck it to disable automation during playback. This option is a great way to temporarily listen to the material in a track without its automation data, while the rest of the mix is still fully automated.
Enable automation recording: Check this box to allow the recording of automation data during playback. This is an important control because when it is enabled, any changes you make to enabled automation parameters in the track — plug-in settings, panning, volume, etc. — will be recorded. So pay careful attention to this button and only enable it when you're sure you want to record your moves.
Automation record mode: The mode menu lets you choose one of the different ways to record automation data into the track. You can change the mode at any time from the Automation Setup window, the track's channel strip in the Mixing Board or the track settings in the Sequence Editor.
Enabling automation by data type: Initially, any plug-in parameter can be automated as soon as you begin using the plug-in. However, you can be very specific regarding the types of data you wish to automate for each track. This allows you to automate certain controls, while leaving others 'free' to be tweaked at will.
'Apply to selected audio/MIDI tracks' button: If you'd like to apply the automation types you've specified in the list to other tracks, select the desired tracks first and then click the Apply to All selected audio/MIDI Tracks button. This operation applies the current track settings to all currently selected audio or MIDI tracks (depending on what type of track is currently being displayed).
'Save as Default for Audio/MIDI tracks' button: If you'd like to apply the automation types you've specified in the list to new tracks automatically when you add them, click the Save as Default for Audio/MIDI Tracks button. There is a separate default state for MIDI and audio tracks. The button changes its wording (audio vs. MIDI) depending on what type of track is currently being displayed.
Automation settings in other windows
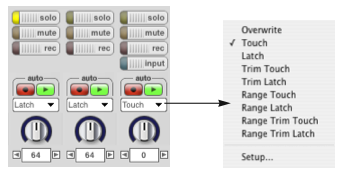
The Mixing Board displays several track-based automation settings directly in the channel strip for each track, just above the pan pot. These settings match the corresponding track settings in the Automation Setup window, the Sequence Editor, the Tracks window and the Effects window. If you change them in one location, they'll change in the others as well.
The automation modes
Digital Performer's automation modes provide different ways to record automation. For example, Overwrite mode starts recording immediately when playback begins, overwriting any existing automation in the track. Touch mode, on the other hand, waits for you to grab a knob or fader before it begins recording.
Each track in the Mixing Board can be independently assigned to one of the modes. The automation mode menu for each track is located just above fader as shown below.

The automation modes are summarized below:
|
Automation mode |
When it punches in |
When it punches out |
|---|---|---|
|
Overwrite |
As soon as playback begins |
Never |
|
Touch |
As soon as you grab the fader or knob |
As soon as you release the fader or knob |
|
Latch |
As soon as you grab the fader or knob |
Never |
|
Trim Touch |
----- Same as Touch ------ |
|
|
Trim Latch |
----- Same as Latch ------ |
|
|
Range Touch |
----- See below** ------ |
|
|
Range Latch |
----- See below** ------ |
|
|
Range Trim Touch |
----- See below** ------ |
|
|
Range Trim Latch |
----- See below** ------ |
|
* In Overwrite or Latch modes, there are actually two ways you can punch out of recording on the fly:
-
Disable automation recording (using any available method for disabling it)
OR
-
Switch to a different automation mode
** For details on the Range automation modes, refer to the Digital Performer User Guide.
The three types of plug-in automation data
Plug-ins have a wide variety of controls that fall into three general types of data: All three types of automation are displayed together in the Sequence Editor.

Sample-accurate ramps: Digital Performer's ramp automation produces a smooth change from one control point to the next. Ramps are calculated with sample-accurate, 32-bit floating point processing. Sample-accurate processing ensures that the ramp will be perfectly smooth, with no zipper noise or other unwanted artifacts.
Stair steps: Stair-step automation produces a sudden change at each control point. Stair-step automation is used for plug-in parameters that by nature don't call for smooth changes but instead provide discrete changes among several various states. A good example are the LFO phase controls in Sonic Modulator, which provide eight phase settings in 45-degree increments. Stair steps are also used for parameters that would be too "expensive" from a DSP bandwidth standpoint for calculating ramps. A good example of this is LFO rate.
Discrete events: Discrete events are used for any parameter that consists of two or more non-numeric settings (or just a few numeric ones). A good example is the waveform for an LFO: it could be a sine wave, square wave, sawtooth, triangle, etc. Rather than displaying these values as cryptic dots on a line, Digital Performer provides single automation events, as shown above.
Insert an event: Choose it from the insert menu and click at the desired location.
To delete an event: Click it to select it and press delete.
To change its setting: Press on its menu triangle and choose the desired setting from the menu.
To move an event: Drag it.
One important thing to realize about discrete parameters is that they don't display their current value continuously throughout the track the way that ramps and stair steps do. To determine the current setting for a discrete parameter, you need to scroll backwards in the track to find the last discrete event of the type you're concerned with, and then look at its setting there.
Units of measurement
In Digital Performer's included plug-ins, the numeric value for each plug-in effect parameter (displayed in the Event List, pointer coordinates box and event info bar) is displayed with the appropriate format (percent, milliseconds, etc.) for the parameter. This is also true for most third-party plug-ins. Some third-party plug-ins, however, may have their own schemes for displaying parameter values. Check their documentation for details.
Working with automation control points
Digital Performer supports many techniques for inserting and editing automation control points in the Sequence Editor, including a new techniques for selecting and dragging multiple control points at one time. For details, refer to the Digital Performer User Guide.
Mute region and clear Mute Automation
The Mute Region and Clear Mute Automation commands in the Region menu allow you to quickly apply and clear mute automation on a region by region basis in any editor window or the Tracks window. Just make a selection, such as an individual soundbite or any time range selection over any combination of MIDI and/or audio tracks, and then choose of these two commands from the Region menu to mute or unmute the selection.
Tempo locked, beat-based automation
Many of Digital Performer's included audio plug-ins have the ability to lock various parameters to the tempo and beat of your sequence. For example, you could lock an LFO filter sweep to quarter notes or lock delay taps to triplet sixteenth notes. Plug-ins that support tempo-based automation provide a global tempo lock menu for the plug-in with the following tempo lock modes:
Real time: Lock to real time if you don't need to synchronize the plug-in's parameters to the tempo of your sequence and instead need to work with them a real time format such as milliseconds.
Beats: Lock to beats when you want the effect to follow the "pulse" of your music. Use this mode for 4/4-based dance music (or similar meters like 3/4, 2/4, etc.)
This mode is also ideal for tempo-based effects over music with meter changes because the automation will always follow the beat — even through your meter changes, as determined by the click value of each meter change. Remember, when you insert meter changes, you also choose what 'gets the beat'. This is what we refer to as the click value. Beat-based automation always follows the click value of each meter change.
The rule of thumb when using Beats mode is this: a quarter equals one beat, whatever the beat happens to be (as determined by the meter). It could be a dotted quarter (in 6/8 time) or a half note (in 4/2 time) and so on. Use Beats mode when you want automation to follow 'the beat', and the beat is changing from meter change to meter change.
Note value: Lock to Note value when you want the plug-in to pulse at a particular note duration value, regardless of meter. For example, if you choose a 16th note, the effect will pulse to a 16th note pattern (120 ticks at 480 PPQ) regardless of any meter changes in the sequence.
Bars: Lock to Bars when you want an effect to pulse according to measure (bar) boundaries. This is a convenient way to align effects automation on a slightly larger musical scale than beats. For example, you might program a filter sweep to finish on the downbeat of every measure. This is particularly useful when you have meter changes because automation will speed up and slow down dynamically to maintain the measure-based relationship you specify.
Snapshot automation
An automation snapshot is the process of inserting automation data for multiple mix parameters in one step at a particular location — or over a specified time range. For example, you might want to set initial values at the very beginning the project (e.g. bar 1) for all mix parameters you'll be automating. Or, you might like to reset all values for an entire section of a mix, regardless of the automation data currently there. Digital Performer lets you take a snapshot at a particular point in time or apply it to any time range of your choice. You also have complete control over which parameters to include in a snapshot. Snapshot automation can be applied from the Mixing Board, Sequence Editor, Effects window or other windows. Different default settings can be stored for taking snapshots from these different windows.
To take a snapshot, choose Take Automation Snapshot from the Region menu. For complete details, see the Digital Performer User Guide.
Automation preferences
Overwrite mode changes to touch after pass: This automation preference, when checked, causes tracks in Overwrite mode to automatically change over to Touch mode after you record a pass in Overwrite mode. This option helps you to avoid unnecessary or unwanted consecutive overwriting.
Solo & Play Phrase override mute automation: When this option is checked, soloing a track causes mute automation in the track to be ignored, allowing you to always hear the audio in the track. Similarly, if you press Command-spacebar to audition some audio, it will play, even if it is currently being muted by mute automation data. If instead, you would like soloing and auditioning to reflect the track's current mute automation, uncheck this option.
Auto return ramp length: At the end of an automation record pass, when you punch out by either releasing the fader or stopping recording altogether, Digital Performer automatically inserts a return ramp at the punch-out point. This ramp produces a smooth transition from the level you were at when you punched out and the existing data in the track at the punch out point. The Auto return ramp length preference determines the length of this ramp.
Auto punch out delay: This automation preference is useful when you are controlling Digital Performer automation parameters from an external control surface, such as a control surface or a MIDI fader box of some kind. The Auto punch out delay is the amount of time (in milliseconds) after the last event is received from the external knob or fader and the instant when Digital Performer drops out of record (stops recording moves from the external device).
Control surfaces send data with different degrees of sensitivity. With some, you may find that punch out occurs too frequently; with others, you might find that punch-out takes too long. To avoid punch outs that stutter, raise the punch-out delay. To reduce punch-outs that take too long, lower it (but be careful not to lower it so much that it begins to stutter).
Minimum time between recorded points: This automation preference determines how frequently control points will be generated during real-time recording. Lower settings generate more control points that result in finer tracking of your moves. Higher settings produce fewer control points that result in courser tracking of your moves.
Minimum change between recorded points: This automation preference determines how frequently control points will be generated during real-time recording. Lower percentages generate more control points that result in finer tracking of your moves. Higher percentages produce fewer control points that result in courser tracking of your moves.
Removing and restoring plug-ins
If you remove a plug-in from a track entirely, its automation data remains in the track, and it can still be edited. If you later restore the plug-in (on any insert), the automation data will once again automate the plug-in. Orphaned automation data is displayed in the Track Display menu with italic text, along with the word missing.
Automation and system resources
Automation adds to overall CPU processing overhead. If your mix is taxing your computer, you can conserve CPU overhead by enabling automation only for data types and plug-in parameters that you need. For example, don't enable automation for an effect parameter and then insert only one setting for the parameter in the track. Only enable automation for parameters that need to change over time.
Control surfaces
Devices such as the Mackie Control, Mackie HUI, Euphonix MC Mix, Euphonix MC Control, and Radical Technologies SAC-2K serve as sophisticated, integrated control surfaces for Digital Performer's automated mixing environment. For details, see the Digital Performer User Guide.