Audio Plug-ins
An audio effects plug-in is a piece of peripheral software (developed by MOTU or another company) that can be used from within Digital Performer. Digital Performer serves as a host program for the plug-in, allowing you to apply its processing to your audio. Depending on the type of plug-in, you can either use the plug-in as a region operation, selecting individual soundbites and then choosing the plug-in from the Audio menu, or you can apply it to an entire track as a real-time insert for the track in the Mixing Board.
Supported plug-in formats
Digital Performer supports plug-ins in the following plug-in formats:
- MAS (MOTU Audio System)
- Audio Units (AU) - macOS only
- VST
- VST2
- VST3
Real-time plug-in processing
Almost all MOTU Audio System plug-in effects can be processed dynamically during playback. They do not require extra hardware installed inside your computer because their processing is handled by the computer itself (referred to as native processing). Digital Performer includes dozens of MOTU Audio System plug-ins, from basics (such as 8-band parametric EQ, reverb, and dynamics) to vintage gear emulations to exotic forms of processing that are unique to Digital Performer. DP also includes virtual instruments. Many third-party plug-ins are also available.
The amount of effects processing you can apply at one time has no inherent limit in Digital Performer. Instead, it depends on how fast your computer is: the faster the computer, the more real time effects you can use simultaneously.
Using effects plug-ins
Applying audio effects plug-ins to your audio tracks is straightforward: just choose the desired plug-in from one of the inserts for the track in the Mixing Board. Once you choose the effect (either from the plug-in chooser window or the menu provided), the Effects window appears with the settings for the plug-in. If the Effects window is already open, you can choose the effect from the menu provided at the top of the window.
All of the features in the Effects window apply to audio effects, including using the Bypass button to temporarily remove the effect.
Automatic latency (delay) compensation
Some plug-ins introduce a small amount of delay (latency) to the track on which they are instantiated. Here are a few examples of plug-ins that introduce latency:
- Universal Audio UAD plug-ins
- Any plug-in that employs look-ahead
The amount of the delay depends on the plug-in, and the delay is usually unavoidable, due to the nature of the plug-in itself. For example, a look-ahead peak limiter must delay the signal by the amount of the look-ahead in order to do its job (usually several milliseconds). Hardware accelerated plug-ins, such as UAD plug-ins, require an extra loop in their signal path between the host computer and the acceleration hardware, and this loop introduces a small amount of delay (usually on the order of several hundred samples or so).
Digital Performer provides automatic compensation for plug-in latency when disk audio is being played through the plug-in. In essence, Digital Performer knows the exact amount of delay introduced by the plug-in (down to the sample) and simply feeds the disk audio to the plug-in early by that same amount, so that the plug-in has just enough time to process the audio and play it perfectly on time, with sample-accurate precision.
Automatic delay compensation only works with audio files being played back from a hard disk or virtual instruments being triggered by prerecorded MIDI tracks. Delay compensation cannot be applied to live audio or MIDI being patched through from an external live source (because it cannot be cued early by the audio engine).
Digital Performer automatically determines the delay compensation for each plug-in, if any. There is no additional preparation necessary. In addition, Digital Performer supports delay compensation for any MAS, VST, or Audio Unit plug-in or virtual instrument.
Most of the time, you will probably want to leave the Auto Plug-in Latency Compensation option enabled (Setup menu > Configure Audio System > Configure Studio Settings). The only time you would likely need to disable it is if you are working with a project created in an earlier version of Digital Performer in which you set up latency compensation manually with delay plug-ins, etc. To make your old file play back exactly like it did in earlier versions of DP without making any changes to it, unchecked this option. If you wish, you could then remove your manual latency compensation and then re-enable automatic compensation.
Real-time versus rendered effects
By default, Digital Performer transparently pre- renders audio output from virtual instrument tracks and audio tracks with plug-ins instantiated on them to dramatically reduce their CPU load. This is called pre-generation, and it greatly enhances Digital Performer’s CPU performance, allowing you to instantiate many times the number of instruments and plug-ins that you would be able to run in real time.
Digital Performer seamlessly manages transitions between pre-generated audio and live audio as needed (such as when you record a virtual instrument live). In addition, virtual instruments are always available for preview activities, such as editing notes in the MIDI Graphic Editor or using a VI’s on-screen keyboard.
To fine-tune the responsiveness of plug-ins and virtual instruments, go to Setup menu > Configure Audio System > Configure Studio Settings and adjust the Prime Milliseconds setting.
Pre-gen operation with 3rd-party plugins
MOTU works hard to ensure a high level of compatibility with 3rd-party virtual instruments and effects. There may be cases where pre- generation may not work as expected with a given 3rd-party plug-in. These cases should be reported to MOTU and the plug-in vendor so that compatibility can be fully established. In the meantime, you can run the plug-in or instrument in real time. To force a virtual instrument track into real-time operation, record-enable any MIDI track that targets the instrument. To force an audio track’s effects into real time, the track can either be record-enabled or monitor-enabled. Alternately, the effect can be placed on an aux track, either in a chunk or a V-rack, with bussing used to access the effect. Aux track effects are always rendered in real- time.
File-based plug-in processing
File-based processing does not occur in real time. Instead, it is applied similarly to Digital Performer’s time-stretching features: you select soundbites to be processed (using one of Digital Performer’s many methods for selecting soundbites), and then you apply the plug-in by choosing it from the Audio menu. A window appears for the plug-in, you make settings, preview the settings (if previewing is available), and then click OK. When you do, a new audio file is created on your hard drive that consists of the original soundbites with the effect applied to them (plus any bite gain, if any has been applied to the original soundbite). Processing occurs in the background.
All MAS plug-ins can be applied as file-based processing. There is one plug-in that is provided as a file-based plug-in only (in the Audio menu only): Reverse.
When applying audio plug-ins from the Audio menu > Apply Plug-in sub-menu, you can preview the effect before applying it permanently by clicking the Preview button. When you click the Preview button, the currently selected region loops continuously until you click the Stop button (or click anywhere outside the effect window). Parameter adjustments can be heard in real time as you change them. A preroll and postroll amount can be added to the beginning and end of the currently selected region for previewing purposes.
Digital Performer can host MOTU Audio System (MAS) plug-ins. The MAS specification is a plug-in standard developed by MOTU that has been adopted by audio plug-in developers to optimize their products for use with Digital Performer.You can install MAS plug-ins on your computer and use them from within Digital Performer. The plug-in may also be supplied and installed in other plug-in formats as well for use with other host applications.
Installing MAS plug-ins
Digital Performer looks for MAS plug-ins in these lcoations on your computer's hard drive:
- macOS: Macintosh HD/Library/Audio/Plug-ins/MAS and Macintosh HD/Users/Current User/Library/Audio/Plug-ins/MAS
- Windows*: C:\Program Files Common Files\MOTU\Plug-ins\MAS
*If you are running the 32-bit version of DP on a 64-bit Windows system, the root of the path is: C:\Program Files (x86).
MAS plug-ins and macOS
For MacOS, the user library directory refers to the user who is currently logged in to Mac OS X.
Depending on how they were installed, plug-ins for Digital Performer are placed in one of the two locations shown above. If plug-ins are installed into the user library directory, they are installed for the user who is currently logged in to Mac OS X at the time of installation.
Organizing MAS plug-ins in macOS
You can organize the plug-ins across the system and user library directory locations as you prefer, with the following rules in mind:
- Plug-ins are bound to log-in access. For example, plug-ins that are placed in a user directory are available only when that user is logged in. This allows you to maintain different sets of Digital Performer plug-ins in multi-user environments.
- Never duplicate a plug-in across the system and user directories (although you could duplicate a plug-in across multiple user directories, since only one user directory is active at a time).
- You can organize plug-ins into folders, as explained in the later.
Expand buttons
Several MAS and 3rd-party plug-ins have sections that can be shown or hidden as desired using an expand button. Examples are eVerb and the Parametric EQ plug-ins.
Digital Performer can host VST plug-ins (VST2 or VST3) on both Mac and Windows, and Audio Unit (AU) plug-ins on MacOS. The VST and AU specifications are a plug-in standards that are widely adopted by music and audio software developers. You can install VSTs and AUs on your computer, and use them from within Digital Performer or other host applications that support them.
Installing AUs and VSTs
Digital Performer looks for VST and AU plug-ins in these locations on your computer‘s hard drive:
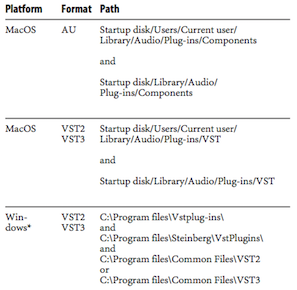
*If you are running the 32-bit version of DP on a 64-bit Windows system, the root of the path is: C:\Program Files (x86).
For macOS, the user library directory refers to the user who is currently logged in to Mac OS X. If AU plug-ins are installed into the user library directory, they are installed for the user who is currently logged in to Mac OS X at the time of installation.
Plug-in examination
When you run Digital Performer for the first time, or after installing one or more new plug-ins, DP examines them during the loading process, checking them for problems. On macOS, DP will first ask you to choose a primary external plug-in format (VST2, VST3 or AU) to examine and use as your preferred format. This process may take a few minutes, depending on the nature and quantity of the plug-ins installed in your system. Each plug-in is examined only once, the first time it is loaded by Digital Performer. On subsequent launches, plug-ins that have already been examined will not be examined again. If a problem is detected with a particular plug-in, it will not be loaded for use in DP to prevent crashing and other serious problems.
You can choose to skip the examination of a particular plug-in, in which case it is not loaded and will not be available for use in that particular session. Skipped plug-ins can be examined later, the next time you launch Digital Performer or in the Plug-in Manager.
If you wish to completely remove a plug-in so that it will not be examined or loaded, simply remove it from the folder where it is installed.
If a problem is detected with a particular plug-in, it will not be loaded for use in Digital Performer to prevent crashing and other serious problems. In the event that problems are found, the plug-in will be disabled and will not be loaded by Digital Performer. Contact the developer for information about updates for the plug-in.
Audio Plug-in Preferences
To access Digital Performer‘s audio plug-in preferences, go to Preferences in the Digital Performer menu (macOS) or Edit menu (Windows) and click Audio Plug-ins in the list. These settings allow you inspect, enable, disable and otherwise manage the audio plug-ins installed in your system.
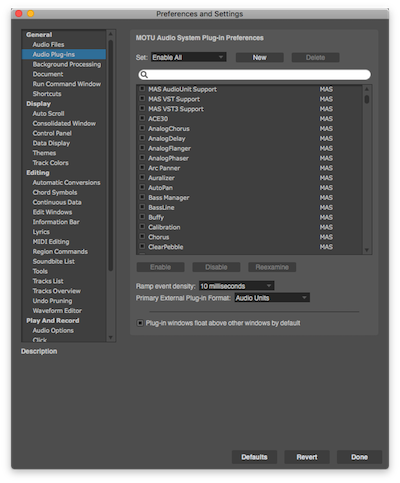
When you change any settings in the audio plug-in preferences pane (except for the Ramp event density setting, see below), the MOTU Audio System must restart to apply your changes.You will be prompted to do so when closing the Preferences window, or when switching to another preference pane.
Plug-ins list
All MAS, VST and Audio Unit plug-ins installed in your system and available to Digital Performer will be listed in this preference pane, with the plug-in format shown to the right of each plug-in. Use the search field to quickly locate a particular plug-in.
Each plug-in has a checkbox next to it. When the box is checked, the plug-in is enabled; when unchecked, the plug-in is disabled. Disabled plug-ins will not be loaded and will not appear in your audio plug-in lists in the Mixing Board or Audio menu > Apply Plug-in sub-menu (or in the case of instrument plug-ins, under the Project menu > Add Track > Instrument Track sub-menu).
You can also enable or disable multiple plug-ins simultaneously by selecting them and using the Enable and Disable buttons. Shift-click in the plug-in list to select a range of plug-ins, or Command/Ctrl-click to select non-contiguous plug-ins.
Examining VSTs and AUs
VSTs and Audio Units will be automatically examined the first time Digital Performer is launched after they are installed. The result of the examination is listed next to each plug- in. The possible results are:
- Passed: The plug-in passed examination and is available for use.
- Failed: The plug-in did not pass examination and will not be loaded.
- Skipped: Examination of the plug-in was skipped and will be automatically reexamined the next time the MOTU Audio System is restarted.
- Duplicate: Multiple versions of the plug-in exist; for example, both a VST and MAS version exist. The MAS version is loaded.
- Non-primary: Indicates that the plug-in is not the primary format chosen in the preferences
If you wish to reexamine a plug-in or plug-ins, select the desired plug-ins and press the Reexamine button.
Plug-ins with multiple verisons (formats)
Some plug-ins are supplied (and installed into your system) in several plug-in formats. For example, you might see both a VST and AU, or VST2 and VST3 version of the same plug-in in the list. By default, one of the formats is enabled and the other is disabled and labeled either Duplicate or Non- primary. You can manually switch formats by unchecking and checking the boxes next to each plug-in as needed. You can enable AU, VST2, and VST3 versions of your plug-ins at the same time. However, this can cause some confusion, and is generally not recommended.
Plug-ins sets
Plug-in sets are custom collections of enabled audio plug-ins. Loading a plug-in set will enable only a specific subset of your plug-ins.
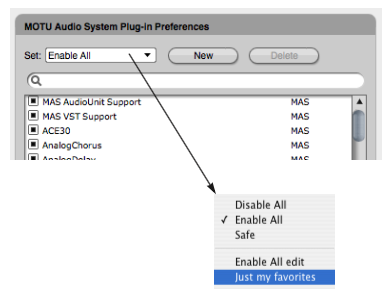
To choose a plug-in set, select it from the plug-in set menu. The chosen plug-in set will be displayed, but its plug-ins will not be loaded until you restart the MOTU Audio System.
- Enable All: When you choose the Enable All plug-in set, all plug-ins (except ones that did not pass examination) are enabled. This is the default plug-in set.
- Disable All: When you choose the Disable All plug-in set, all plug-ins (except for Digital Performer’s included surround panner plug-ins) will be disabled.
- Safe: When you choose the Safe plug-in set, only the plug-ins which are included with Digital Performer are enabled; all other plug-ins will be disabled.
To create a new plug-in set, click the New button, enter a name, and click OK. To delete a plug-in set, choose it from the plug-in set menu and click the Delete button. When Enable All, Disable All or Safe is chosen, the Delete button will be grayed out as these plug-in sets cannot be deleted.
The Enable All, Disable All or Safe plug-in sets cannot be modified. If you attempt to enable or disable any plug-ins while one of them is selected, you will be prompted to create a new set.You can then edit the new plug-in set just as you would any other.
Selecting a plug-in set at startup
Hold the Option/Alt key while launching Digital Performer to bring up a dialog which allows you to choose the plug-in set which will be loaded. This can be a helpful troubleshooting technique if you suspect you are having an issue with a 3rd-party plug-in.
Primary external plug-in format
The Primary external plug-in format option determines the format of the plug-ins that DP will examine and enable by default. For macOS, choose Audio Units if you have a large number of existing DP projects that use AUs, and you don’t need to transfer DP projects to and from Windows systems. Choose VST2 or VST3 to increase the cross-platform compatibility of your projects. For Windows, select your preference of VST2 or VST3. This setting can be changed at any time.
Multiple audio outputs for Audio Units and ReWire
Some MAS, VST or AU plug-ings and Rewire-compatible applications provide multiple audio outputs. You can access them in the Instruments tab in the Bundles window. For details, see the Bundles window.
Side chain inputs
A side chain input allows you to route any audio directly into the plug-in itself to control a parameter with the side chain input signal. It appears in a plug-in window as a menu that shows a list of Digital Performer's virtual busses. For MAS plug-ins, the menu appears within the plug-in interface itself; for AU plug-ins, the menu appears in the Effects window along with the other standard controls. To use the side chain input, you choose a bus from the menu, and then route a signal to the bus from any source you want in Digital Performer's mixing environment (a track, a live aux input, etc.).
Several plug-ins have side chain inputs, including the Dynamics plug-in, Ring Modulator and the Multimode Filter.
The Mix setting
For effects that have it, the Mix setting controls how much of the effected signal is included. In the effect presets that are included with Digital Performer, Mix is set to 50% for in-line use; if you are applying the effect to a dedicated bus/aux track, you should set the mix to 100%.
MIDI control of plug-in parameters
Several audio plug-ins, such as the Ring Modulator and Multimode Filter, allow you to control their settings from MIDI note data, either from a MIDI track or from your controller keyboard. For details, refer to the Digital Performer User Guide.
Plug-ins can require a significant amount of CPU bandwidth (your computer’s processing power). The speed of your computer determines how many effects you will be able to apply at one time. Use the Audio Performance window to keep an eye on how much of your CPU bandwidth you are using up with your plug-ins. The Audio Performance window can be opened by choosing Audio Performance from the Studio menu.
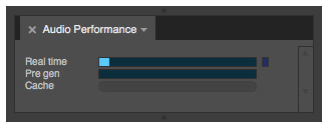
For tips on conserving the processing resources of your computer, see "Optimizing performance" on page 30 and "More ways to enhance performance" on page 33 in the DP Getting Started Guide.
Monitoring Effect Performance
The Effect Performance window (Studio menu) monitors the processing load of all currently instantiated virtual instruments and effects plug-ins. It can help you identify and manage plug-ins that impose high processing demands on your computer.
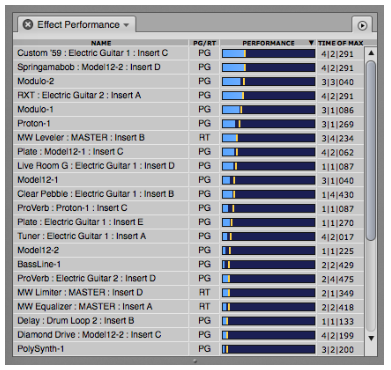
List sorting: Click the column headings in the Effect Performance list to sort by name, performance, etc. Each heading can sort from top to bottom or bottom to top (or high to low, low to high, etc.) Click the heading to toggle the sort order. When sorting by Performance or Time of Max, the list reorders on the fly, as demand fluctuates during playback.
PG/RT: The PG/RT column shows whether the plug-in is running in real time (RT) or pre-gen (PG) mode. If you hover the cursor over the RT indicator for a plug-in, you‘ll see a tool tip that explains why the plug-in is running in real time. If a real-time (RT) plug-in displays exceptionally high performance load, try running it in pre-gen (PG) mode.
Performance meter and Time of Max: The Performance meter provides a visual representation of each plug-in‘s individual CPU load — essentially how hard it is working — as a percentage of the overall processing currently being handled by Digital Performer‘s audio engine. Above the blue meter, there is a maximum peak load indicator shown as a colored line. The color of the line depends on which DP theme you are using. The Time of Max column displays the sequence timeline location where this maximum peak occurred, which can help identify sections of the sequence that are particularly demanding from a CPU standpoint, especially for virtual instruments. Use the Clear Max mini-menu command to clear all max peak indicators and the Time of Max column.
Individual vs. Coalesced: The Effect Performance mini-menu provides two views for this window: Individual and Coalesced. In Individual mode (the default setting) each effect is displayed separately in the list. In Coalesced mode, processing overhead is combined by effect type.
The Time of Max column is not available in Coalesced mode because each line in the Effect Performance list may represent multiple instances of plug-ins which have maximum CPU peaks at different times.
Tips for reducing plug-in performance load
For pre-gen virtual instruments, make sure the MIDI track feeding the instrument is not record- enabled (which temporarily puts them in RT mode).
Some instrument plug-ins, such as MachFive and Omnisphere, can host multiple instruments in one instance of the plug-in. You can reduce overall performance load by creating a separate instance of the plug-in for each instrument (i.e. a separate instrument track), rather than loading multiple instruments into one instance.
Plug-in Automation
Plug-ins can be automated in real time. For complete information, see Mix Automation or Chapter 71 of the DP User Guide (pg. 825)/
Presets are found in the Preset menu in the Effects window when the desired effect is being displayed in the window. For example, when the Effects window is showing the Reverb plug-in, you‘ll see Reverb presets in the Preset menu.
The current preset
When you choose a plug-in preset from the Preset menu, the preset name is displayed in the Preset menu as seen below. It also gets a check mark next to the name when the menu is open. If no preset has been loaded, “None” is displayed.
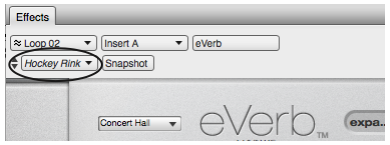
If you modify the settings, the name of the preset will become italic to let you know that you are now working with a modified preset. If you like, you can save the modified preset as a new preset with the Save Settings Preset menu command.
Where presets are stored
MAS plug-in ‘factory‘ presets are stored with the plug-in itself, so they are always available in any Digital Performer project.
Saving plug-in settings as a user preset
To save the current plug-in settings as a preset, choose Save Settings from the Preset menu and type in the desired name. You can save the settings anywhere you wish on disk, but if you would like them to appear in the User Presets sub-menu, save them in the plug-in‘s presets folder. For example, presets for the Chorus plug-in would be stored here:
- macOS: /Library/Audio/Presets/Digital Performer/Chorus
- Windows: User\Documents\MAS Presets\MOTU\Chorus
If it is saved in this location, the new preset appears in the User Presets sub-menu.
Use the Show Presets in Finder/Explorer mini-menu command to go to the folder where user presets are stored for a plug-in. There, you can rename, duplicate, delete, etc. your preset files.
VST and Audio Unit presets
Some VST and Audio Unit plug-ins have the ability to save presets as a standard preset file on disk. Digital Performer supports these preset files. You can save them and load them in the same way as MAS plug-in presets, including the ability to drag and drop them to inserts in the Mixing Board.
Storing and recalling presets as clippings
You can save and recall presets—and even groups of presets—as clippings. For more information on this, see pg. 820 of the Digital Performer User Guide.
‘Compare‘ Preset menu item
The Compare Preset menu item lets you compare a modified preset with the original, unmodified preset. You can freely switch back and forth between them to make a thorough A/B comparison.
When you first call up a preset from the Effects window Presets menu (either a factory preset or a user preset you created), the Compare menu item is grayed to indicate that the preset is currently unmodified.
As soon as you modify a plug-in parameter, the Compare menu item becomes ungrayed, indicating that the preset has been modified.
If you now choose Compare, it becomes checked, andtheoriginalpresetsettingsarerestored.In addition, your modified settings are stored by the Compare feature, ready for recall.
If you choose the Compare menu item again, it becomes unchecked, and your modified preset is restored.You can then freely switch back and forth between the original preset (checked) and the modified preset (unchecked).