Bundles
The Bundles window (Studio menu) serves as the crucial link between the virtual mixing world in Digital Performer and the audio and MIDI hardware that is physically connected to your computer. The Bundles window provides a convenient layer between them that lets you effectively manage audio and MIDI input and output.
Audio inputs, outputs and busses are all accessed via audio bundles. An audio bundle groups together a set of ins, outs or busses, then lets you refer to that group as a single entity. Audio bundles provides a layer of indirection between the audio assignment menus and the inputs, outputs and busses they contain. This is similar to how style sheets work in word processing programs. Instead of defining "Times, 12pt" for sections of text, you define a style called "Body Text" whose properties are "Times, 12pt." This way, you can re-format your entire document by simply redefining what "Body Text" means.
In Digital Performer, you could have a large project consisting of many sequences with complex output and bussing assignments. Should you decide to switch a bus from an outboard reverb to an internal plug-in, the Bundles window allows you to rewire your entire project in a single operation.
You can even change the behavior of existing bundles. If you decide you want to make a surround mix of your stereo project, simply change your primary output assignment from a stereo bundle to a surround bundle.
Bundles allows you to clean up your assignment menus, choosing only to display bundles that you'll actually use. For example, you might not need to look at 32 outputs from any single virtual instrument.
Once a bundle is defined, it is available on the input and output assignments menus throughout Digital Performer.

Five tabs
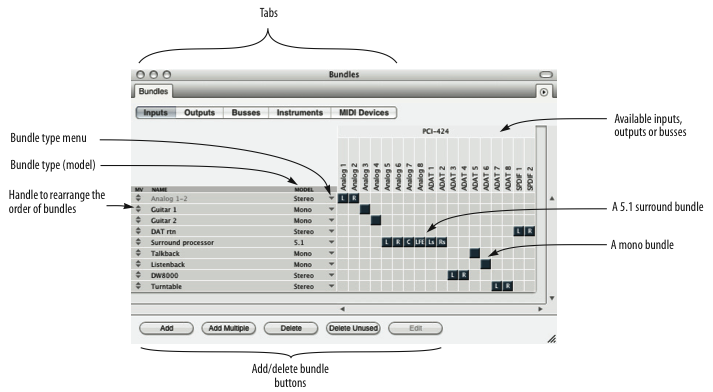
The Bundles window has five tabs that display inputs, outputs, buses, instrument outputs and MIDI devices. Click on a tab to view the type of bundle you wish to edit. Before adding or removing bundles, be sure you are looking at the correct tab.
Adding and deleting bundles
At the bottom of the bundles window, you will find five buttons. Click the Add button to add a single bundle, or if you need to create a number of bundles, click the Add Multiple button. Bundles can be deleted by selecting a bundle and clicking the Delete button. Use the Delete Unused button to get rid of all bundles shown in the list that are not currently being used in the project. The Edit button is used to modify MIDI devices.
Creating an audio bundle from assignment menus
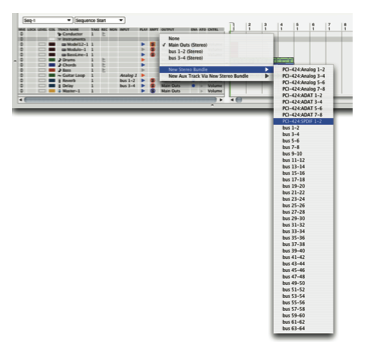
Anywhere in Digital Performer where you can choose an input or output assignment, such as in the Tracks window, you can also create a new bundle. Once a bundle is defined, it will remain available until the bundle is deleted.

Renaming bundles
By renaming a bundle, you can create your own names for audio inputs, outputs and buses. For example, instead of generic terms like "Analog 1", you could name an audio input in your system "My U87 Mic". The customized bundle name will appear in all menus that display audio inputs, outputs and/or virtual buses.
To name a bundle, double-click or Option-click on a bundle name. When you're done, hit the Return key. The Enter key moves the edit field to the next bundle name.
Working with tiles on the grid
The Bundles window consists a grid where you can place and move tiles that connect audio bundles (rows) that you define to their sources or destinations (columns). You make a connection by placing a tile in the grid square that intersects the bundle (row) with its source or destination (column).
Most sources or destinations are the physical inputs and outputs on an audio or MIDI interface, but they can also be busses inside of Digital Performer or connections to virtual instruments.
The sources and destinations available are displayed in the upper right corner of the Bundles window. The are identified by device and then individual input or output. You may have to scroll left to right to see all available inputs and outputs for each device, especially if you are using multiple devices.
Bundle channel formats
Once you've created a bundle, choose a channel format for it (mono, stereo, 5.1 surround, etc.) from the menu to its right.
Bundle properties are bound to a hardware driver
When you create bundles, the following properties are bound to the audio hardware driver currently active in the Configure Hardware Driver dialog (under Setup menu>Configure Audio System):
- the bundle model (mono, stereo, 5.1, etc.)
- the bundle’s physical output assignments (the arrangement of the channel tiles in the grid)
If you switch to a different hardware driver, the bundles you've created remain, but you can completely reconfigure the properties listed above without disturbing these same properties for the original hardware driver. For example, if you are working with a MOTU 2408mk3 (or other PCI-424 based audio interface), and you then switch to built-in audio, you can change the physical output assignments (move the tiles) for a bundle for built-in audio without disturbing your 2408mk3 output assignments.
This same principle applies when switching between different MAS drivers (such as from the PCI-424 driver to the MOTU FireWire driver).
The Instruments tab
Some Audio Unit (AU), VST2 and VST3 plug-ins and ReWire-compatible applications provide multiple audio outputs. You can use the Instruments tab to route them anywhere in the Digital Performer mixing environment. For details, refer to the Digital Performer User Guide.
The Devices tab
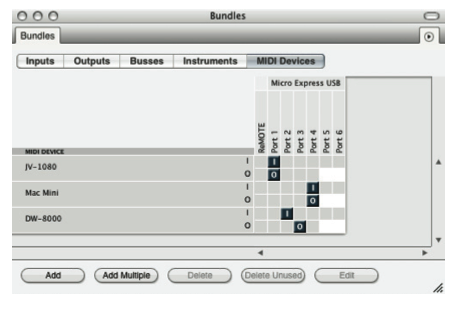
The MIDI Devices tab lets you create and configure MIDI devices connected to your MIDI hardware. This allows you to save the device configuration with the DP project for convenient transfer to other systems.
Click a device to highlight and click the Edit button to specify the manufacturer and model for the device and to make additional device property settings.
Any connected MIDI interfaces appear across the top of the window, with their MIDI ports shown in columns beneath the interface. Drag the MIDI in and MIDI out tile for each MIDI device to the appropriate MIDI interface port column (the column that represents the physical port it is connected to on the MIDI interface). In the example below, the Kurzweil K2600 is connected to MIDI IN port 2 and MIDI OUT port 2 on the micro express USB interface.

Bundles mini-menu
There are three options in the Bundles window mini-menu that allow you to exchange bundles between Digital Performer projects.
Import Bundles: Imports a saved bundle into the current Digital Performer project. Bundles already in the project will be retained along with the newly added bundles.
Clear and Import Bundles: Clears the current bundles and imports the saved bundles into the current Digital Performer project.
Export Bundles: Exports all audio bundles for use in any other Digital Performer project.