Custom Consoles
Digital Performer's custom consoles provide a host of control items, including:
- Sliders
- Knobs
- Buttons
- Menus
Each control item can be used for virtually any musical purpose that involves MIDI data. For example, a control item can:
- Act as a "virtual" MIDI instrument, generating continuous data which can be sent to synthesizers and recorded into tracks
- Remap data, such as velocities into controllers
- Modify velocities of notes as you play back
- Generate system exclusive data to modify synth parameters on the fly
- Generate controller data to control and shape the sounds in your synthesizers
The sliders, knobs, and buttons can be controlled in real time, while Digital Performer is playing back or recording, to create musical effects. In addition, they animate during playback to reflect what you have recorded.
Note: for standard multitrack mixing of MIDI tracks (volume and pan control), use the Mixing Board (Project menu). It provides a more advanced environment for mixing applications.

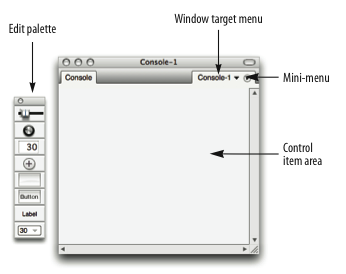
Window target: This displays the current console. If you have more than one console in your project, you can switches between them with this menu. You can also open multiple Console windows from the Project > Consoles menu.
Mini-menu: Use the "Edit Console" item under the mini-menu to toggle Edit mode on or off. A variety of other commands are also available.
Edit palette: This appears when Edit mode is enabled. To add control items to the console, drag them from the Edit palette to the control item area.
Control Items area: This is the area where you create and position the knobs, sliders, buttons, etc.
Mini-menu Quick Reference
Edit Console: Toggles between two modes in the console. When Edit Mode is on (the item is checked), console items can be moved, resized, deleted, and otherwise graphically manipulated, and the edit palette appears. When Edit mode is off, the Edit palette is hidden and control items cannot be moved; instead, sliders slide, knobs turn, buttons push, and so on.
Set Console Name: Provides a dialog box in which you can change the name that displays in the title bar of the console and in the Windows menu.
Duplicate: Makes a copy of selected control items.
Snap to Grid: Toggles whether or not control items snap to an invisible grid in the console when they are moved or resized. When checked, Grid Snap is on. When not checked, Grid Snap is off.
Set Grid Spacing: determines the resolution of the snap grid when snapping is turned on. The resolution is measured in screen pixels, which are approximately 72 dots per inch (dpi).
Align controls: Lines up selected controls to one another in a configuration that you choose. For example, you can line up the centers of several control items by selecting them and choosing this command.
Go to Zero: Sets the value of the highlighted control item(s) to zero.
Go to Null Point: Sets the value of a highlighted master control item to its null point.
Group: Opens the Grouping dialog box for the highlighted control items. This command allows you to assign control items to a group all at once rather than one at a time.
Ungroup: Removes the highlighted control items from their assigned group.
Control Assignment: Opens the Control Assignment dialog box for the currently selected control item in the console. This dialog contains all of the settings for how the control item behaves.
Set Source: Lets you assign a remote control to one or more selected control items together at one time.
Set Target: Lets you assign one or more control items to a destination together at one time.
Min(imum) Time and Value Change: Lets you control the density of the controller data generated by a control item by increasing or reducing the minimum allowed time and value change between controllers.
Name item: Lets you type in a name for a currently selected control item.
Delete Control: Removes the currently selected control item(s) from the console.
Delete Console: Removes the console from the screen and removes its name from the Windows menu.
Custom Console Basics
Custom Console control items serve two functions. First, they monitor MIDI data being played from their target track or MIDI channel, animating in real time to reflect the data's current value. For example, let's say you have a track containing a stream of controller #1 (mod wheel) data, and the controllers increase in value over the span of two measures of music (in the range from zero to 127). A control item assigned to monitor controller #1 in the track will move as the track is played back, reflecting the changes in the values of the controller.
Secondly, control items generate new continuous MIDI controller data in real time when you take control of them, and send the data to either a MIDI device or track. When you take control of a control item, the new data that it generates overrides the data already in the track.
To demonstrate this, let's return to the mod wheel example above. If you play back the track and grab the control item with the mouse half way through the stream of mod wheel data, you will take control of the track with the control item. The mod wheel data remains in the track (assuming that recording is not engaged), but it does not get played as long as you are gripping the control item with the mouse. If you release the control item, it will immediately begin monitoring the existing data in the track again.
In summary, control items monitor continuous data being played back from their target track or MIDI channel. Grabbing a control item generates new data which overrides the data in its target track. During playback (Digital Performer is not recording), the new data does not modify the track; it only temporarily overrides the continuous data in the track. (If recording is engaged, then your new moves replace existing data.)