Clips Window
The Clips window is a dynamic, interactive environment for triggering audio and MIDI clips during live performance. You can prepare any number of MIDI and audio clips and then individually trigger them during playback. If you enable the queue, you can cue up any number of clips ina dvance to play consecutively. You can also set up and trigger scenes, which consist of multiple clips arranged in a single row for simultaneous triggering. The Clip Editor lets you view, edit and create clips. You can also copy and paste track material to make clips, or drag and drop them from the Soundbites window or Content Browser.
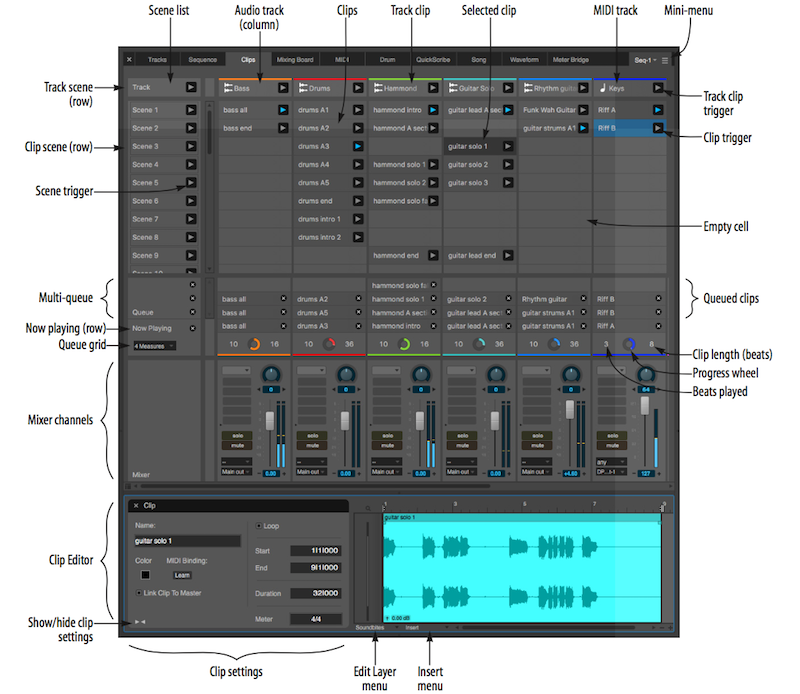
Track (column): Each track (audio, MIDI, instrument, aux, VCA, or Master Fader) is represented as a column
Clips: Clips of any length can be placed in cells and triggered in any order you wish. Clips can contain audio, MIDI information, or even automation data. Audio clips go in in audio tracks (mono or stereo) and MIDI clips go in MIDI tracks. Clips with only automation can go in audio, MIDI, or instrument tracks.
Clip trigger: Click to play or queue the clip. The clips drops to the Now Playing or Multi-queue section at the cottom of the column.
Track clip: The top row of cells are track clips, which represent material in the track itself (i.e. a soundbite that is in the linear timeline as seen in the Sequence Editor).
Track clip trigger: Click to play or queue the clip. The clip drops to the Now Playing row or the Multi-queue section at the bottom of the column - when a track clip is playing, whatever is in the timeline at that measure will play.
Scene list: A scene consists of an entire row of cells. Each row represents a different scene.
Scene trigger: Click to queue or play the scene (row). All the clips in the row drop to the Now Playing row or Multi-queue section at the bottom of the column.
Clip scene (row): A scene consisting of any clips present into the row. Click the scene trigger to play or queue the scene.
Track scene: A scene consisting entirely of track clips (in the top row). Click the scene trigger to play or queue the scene.
Multi-queue: Enable the Multi-queue from the Clips window mini-menu. When enabled, you can cue any number of clips, in the queue, where they then play consecutively.
Queue grid: Determines the interval at which queue clips begin to play, i.e. every 2 bars, 4 bars, 8 bars, etc. The queue grid is bound to the main counter. For example, if the queue grid is set to 4 bars, newly queued clips will begin to play on the downbeat of bars 1, 5, 9, 13, 17, 21, etc. The queue grid only affects clips at the time they are triggered; clips that have already been triggered are not affected if you change it.
Now playing (row): Shows the clip currently playing in each track.
Clip length (in beats): The length of the current clip (in beats)
Progress wheel: Shows the playback progress of the current clip.
Beats played: The number of beats already played for the current clip.
Mixer channels: Displays basic Mixing Board settings for each track, including volume fader, pan, Solo, Mute, I/O assignments and inserts.
Clip Editor: Displays the contents of the selected clip. Lets you set basic parameters and edit the clip's audio or MIDI data.
Clip settings: Baic settings for the clip, including its name, start/end times, etc.
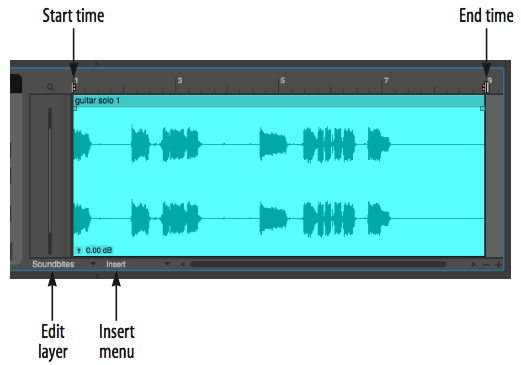
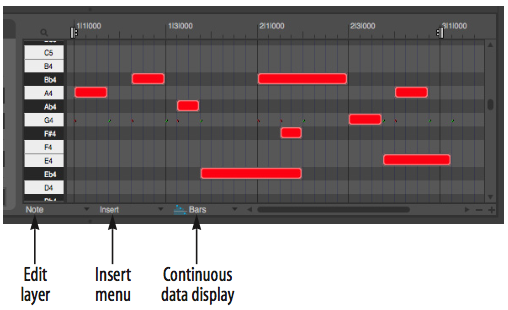
Edit layer menu: Access edit layers of clips here, just like the Sequence Editor.
Insert menu: Insert audio or MIDI data into the clip using this menu, just like the Insert menu in the Sequence Editor.
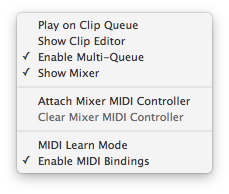
Play on Clip Queue: When enabled (checked), DP's main transports will being playback when you trigger a clip. When unchecked, queueing clips does not start playback.
Show Clip Editor: Displays the Clip Editor below the Clips window.
Enable Multi-Queue: Enables the Multi-queue. When enabled, you can stack any number of clips in the queue, where they then play consecutively.
Show Mixer: Shows or hides the mixer section at the bottom of the window/
Attach/Clear Mixer MIDI Controller: Lets you assign MIDI controller data to items in the Clips dinwo mixer panels for hands-on mixing from your MIDI controller device.
MIDI Learn Mode: Puts the Clips window into a special mode where you can click the active items to assign them to any incoming MIDI triggers, like keyboard keys, controller pads, MIDI pedals, etc.
Enable MIDI Bindings: Temporarily enables or disables any MIDI assignments you made in MIDI Learn Mode.
Right-click a clip to open the Clip menu
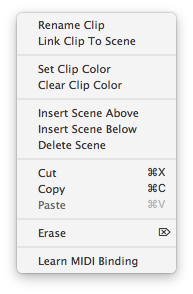
Rename clip: Lets you rename the clip.
Link Clip to Scene:Links or unlinks the clip to its corresponding scene. When linked, it will get triggered with the scene. When unlinked, it won't.
Insert Scene Above/Below: Inserts a new, empty scene (row) above or below the row you've right-clicked.
Delete Scene: Removes the scene (row) that you've right-clicked.
Cut/Copy/Paste: Custs, copies, or pastes into the contents of the cell.
Erase: Empties the cell without affecting the clipboard.
Learn MIDI Binding: Lets you assign a MIDI command to the clip, as indicated in the Clip Editor.
Use Show Clip Editor in the Clips window mini-menu or double-click a clip to show the Clip Editor. The Clip Editor allow you to view and edit the contents of a clip as in the Sequence Editor, along with basic clip settings such as its name, length, etc.
The Clip Editor works the same way as the equivalent features found in the Sequence Editor. This means that you can edit audio data, MIDI data, automation, pitch, stretch, and so on without leaving the Clip Editor.

Clip settings: Each clip has the following clip settings
- Name: The name of clip
- Color: Each clips can be assigned a color to help you organize clips visually by color. You can use the Clip Color setting in Preferences (Digital Performer menu) to set the default color for a clip to a custom color or the color of the track the Clip is on.
- MIDI binding: Click Learn to assign the clip to a MIDI command. When you sent that MIDI command, doing so triggers the clip.
- Link clip to Scene: When checked, the clip is linked to its corresponding scene. When linked, it will get triggered with the scene. When unlinked, it won't.
- Loop: When Loop is checked, the clip loops indefinitely until you either cancel it or trigger another clip. When Loop is unchecked, the clip will play as a one-shot clip (once through only).
- Start/end time: Use the Start/End times to determine when the clip starts and stops playing. You can set these values wherever you want in the clip. You can also edit them graphically using the loop points in the clip editor time ruler.
- Duration: The duration (in beats) of the clip. Changing the duration will affect the end time of the clip if Loop is enabled.
- Meter: The desired meter of the clip.
Show/hide clip settings: Click to expand or collapse the clip settings section.
For an audio clip, you can use the Edit Layer menu to edit volume, pan, pitch, stretch, and more. Use the Insert menu to add track and plugin automation.
MIDI clips offer similar features to editing in the MIDI Editor. Use the Edit layer menu to select the parameters you‘re editing, the Insert menu to add new CC and automation, and the Continuous Data Display menu to choose which way to display continuous data in the grid (Points, Bars, or Lines).
Creating a clip
A clip is created by placing exisitng material into a cell in the grid, or by creating a new, empty clip and using the Clip Editor to construct new material. When placing existing material ina cell, it must be compatible with the track format (MIDI, mono audio, stereo audio, etc.)
Drag and drop: Drag and drop items from other windows - such as the Soundbites list, Content Browser, Sequence Editor, etc. - into any compatible cell. If the cell is already occupied by a clip, the existing clip is replaced.
Copy and paste:
- Copy material from any single track in the Tracks Overview, Sequence Editor, or any other editor.
- Select a cell in the Clip window and paste. Be sure the cell belongs to a track that is compatible with the data you've copied. A new clip will be breated from the material you copied. If the cell is already occupied by a clip, the existing clip is replaced.
Create a new, empty clip:
- Right-click an empty cell and choose New Clip from the menu.
- Use the Clip Editor to build the clip's content.
Playing clips and scenes
Once clips have been placed in the cells of a track, they aren't actually "in" the track. In other words, they exist independently of any material in the track, as viewed in the Tracks Overview, Sequence Editor, or any other edit windows. Accordingly, their buttons won‘t play until you trigger them with their trigger buttons. Until then, you‘ll hear whatever material is in the track. As soon as you trigger a clip, it is played instead of the track material.
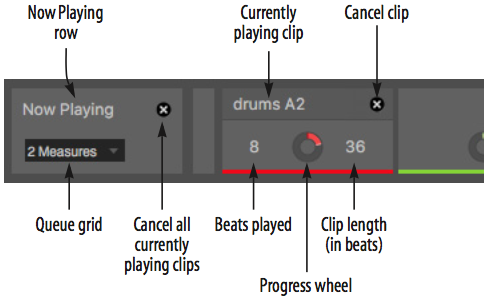
When you trigger clips or scenes, they drop into the Now Playing row and either begin playing, or are queued to being playing at the next queue grid boundary. The clip continues to loop until you either cancel it with the cancel clip button or cancel all clips button, or trigger another clip (unless it's a one-shot clip). In the above image, the queue grid is set to 2 measures. If you trigger a clip or scene at 5|3|000, it will be queued to being playing at the next two-bar downbeat, which would be 7|1|000.
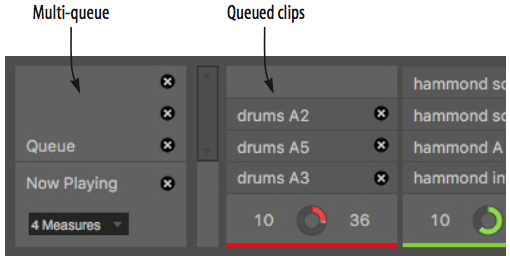
When multi-queue is enabled in the Clips window mini-menu, the multi-queue appears above the Now Playing row. When you then trigger clips or scenes, they get stacked in the queue, each playing consecutively until the final clip makes it to the Now Playing row. At this point, that clip will loop indefinitely until you either cancel it or trigger another clip. When queued clips plau consecutively, they play as follows, depending on their length and the size of the queue grid:
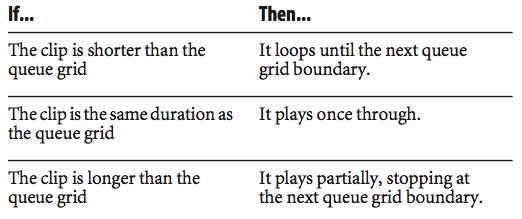
For example, if you have an 8-bar grid and you queued a 1-bar drum loop, followed by a 4-bar drum loop and then an 8-bar drum loop, the 1-bar loop would play 8 times, the 4-bar loop would play twice, and the 8-bar loop would play all the way through, indefinitely (because it's the last one queued).