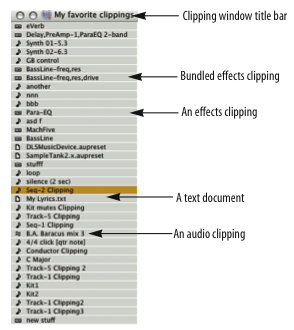
Clippings
A clipping is anything useful that you'd like to conveniently stash for future use. It could be a single note, a four-bar phrase, or an entire sequence — with any number of tracks. It can be MIDI data, audio data, or both. It can even be an effects chain, V-Rack or a word processing document on your hard drive with some song lyrics in it. A clipping can consist of Digital Performer data in a portion of any size. It can also consist of any item found on your Mac OS desktop, including folders, documents from other applications, and so on.
Digital Performer gives you Clipping windows to put all of this material at your fingertips. Clipping windows are meant to be convenient repositories for bits of stuff — audio, MIDI or otherwise — that you'd like to stash conveniently and recall later at your fingertips. You can store clipping windows with a particular Digital Performer file, or you can store them independently the file you have open, so that their contents are always available.

Creating a new clipping window
To create a clipping window, choose Project menu > Clippings > and then choose one of the following:
- New Digital Performer Clipping Window
- New Project Clipping Window
- New Startup Clipping Window
Here's the difference: a Digital Performer clipping window will be available regardless of the file you have open. A project clipping window is specific to the file you create it in; it will save and close with the file. Startup clipping windows can hold aliases to other documents that will automatically launch when you open a Digital Performer project. Startup clipping windows are project-specific, so you can launch documents that pertain specifically to the project in which you create them.
Startup clipping windows are useful for loading up CueMix files, Unisyn performances, Reason sessions or other documents that are related to your Digital Performer project.
Clippings windows are actually folders
Each clipping window actually consists of a folder in either the Clippings folder in your Digital Performer project folder (for file-specific clipping windows) or the Preferences folder in your start-up System Folder (for global clipping windows).
Since Clippings windows are simply folders in the above-mentioned locations, you can also make clipping windows by simply creating folders (with any name you want) in those locations. They will then appear as clippings windows in Digital Performer the next time you open the project or start Digital Performer.
Renaming a clippings window
To rename a clippings window, option click its name, or change the name of its corresponding folder in the Mac OS Finder or Windows Explorer.
Making a clipping
To make a clipping, select some data and choose the Copy to Clipping Window command in the Edit menu. Or you can press Command-Option-C to copy to the last clipping window that you copied to.
You can also drag items from the Finder, from Explorer or from any location from which soundbites can be dragged (such as the Soundbites window and other clipping windows).
Dragging clippings into other Digital Performer windows
Once you've made a clipping by copying it to a Clippings window, you can drag it into any other eligible window in Digital Performer. Eligible windows are windows that can accept the type of data included in the clipping. For example, you can't drag an audio clipping into a MIDI track. But you can drag a clipping that contains both audio and MIDI data into the Track Overview — as long as it contains both MIDI and audio tracks.
To drag and drop a clipping, drag it by its icon (to the left of its name) and drop it into the desired window. Or, you can click it first to select it and then click on it anywhere to grab it.
When you drag and drop a clipping, you are actually making a copy of it (the original remains in the Clippings window).