Bounce
Bounce to Disk does exactly as its name implies: it bounces multiple audio tracks down to a single audio file or stereo pair of audio files. Original tracks are preserved, and new audio files are created during bouncing. It can also bounce your audio tracks to a QuickTime movie.
Bouncing allows you to play back many more tracks than you can play simultaneously on your system by mixing them down to a single track (or stereo track pair). It is especially useful for creating a final mix of a project for mastering to CD or exporting to a QuickTime movie or video authoring applications. Bouncing is also a great way to create a single, contiguous audio file out of a track composed of many smaller ones. And since bouncing occurs in the digital realm, no noise or sonic degradation is introduced. You can bounce as many times as you like without introducing any artifacts as a result of bouncing.
You can also use the Bounce to Disk feature to export a movie with your Digital Performer sound track, or to "bounce & burn" to an audio CD in one step.
Setting outputs
All of the tracks you wish to combine in the bounce operation must be assigned to the same output or bus pair. The Bounce operation will include everything being routed to the output pair or bus pair you choose, including sends that are bussed in from tracks assigned to other outputs. So be sure to assign all the tracks (and sends) you wish to include in the bounce to the same output pair or bus pair before bouncing.
Previewing
After making the necessary output settings (if needed), bouncing to disk is a simple two step process: select any portion of one or more audio tracks and then choose Bounce to Disk from the Audio menu. The results of the bounce will sound exactly the same as what you selected, including volume/pan automation, mute/solo settings, real time MOTU Audio system effects, EQ and any other real time effects that are applied to the selected tracks. Basically, what you hear when you play the sequence back is what you will get in the resulting mixdown.
To preview the results of the bounce, solo the tracks you wish to include in the bounce and play back the sequence.
You can also use the Play Selection command in the Region menu to preview the bounce command. But if you do, be aware that the Play Selection command ignores the current mute and solo settings of the selected tracks, so only select the tracks you actually want to play.
The Bounce to Disk settings
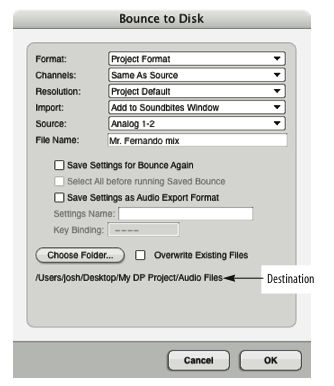
Once you've made the preparations already discussed, selected the tracks you wish to bounce, and chosen the Bounce to Disk command from the Audio menu, the Bounce to Disk dialog appears with the following options.

Format: You can bounce directly to variety of file formats, including to a QuickTime movie or audio CD. Choose the desired format from the menu. For example, if you wish to bounce down to a stereo interleaved AIFF file, choose "AIFF, Interleaved".
Additional options for standard formats
Digital Performer's standard export formats (excludes Core Audio export formats, MP3 export, and QuickTime export) provide the following options:
Channels: Your five choices here are Mono (no attenuation), Mono (with 3.5 dB attenuation), Split Stereo (two mono files), Interleaved Stereo and Split Multi-Channel. (Interleaved Stereo is not available under the MOTU Audio System.)
Mono (no attenuation): Mono creates a single monophonic audio file. Digital Performer simply sums the left and right channels of the outputs of the source tracks, so there is a possibility that the resulting mono mix might clip, even when the source material does not. If this is the case, undo the bounce operation, adjust the levels of the source tracks and bounce again.
Mono (with 3.5 dB attenuation): When bouncing to mono, this option preserves the level when bouncing a signal that is panned center. The attenuation compensates for the 3.5 dB boost you get from summing the left and right channels of a centered signal with equal-power panning.
Stereo: Stereo creates a either a single stereo audio file, or two mono audio files that together comprise the stereo image (depending if you've chosen an Interleaved or Deinterleaved format). Deinterleaved files share the same file name with .L and .R extensions appended to the end.
Same as Source: This creates a file with the same number of channels as the Source bundle. If you are bouncing a surround bundle, choose this option to bounce to a surround file.
Sample Format: You can choose 8, 16, 24, or 32 bits, or the Project Format. If you choose 8 bits (a sample format not supported by Digital Performer for playback), the Import option below will force you to choose the Do not import setting.
8-bit resolution is typically applied to audio that will be used in multimedia and internet applications because it significantly reduces the size of the audio files, halving the bandwidth required to deliver the sound. When you are bouncing down to 8-bit audio, you may want to apply Digital Performer's MasterWorks Compressor (or a third-party dynamics plug-in of your choice) to the mix to counteract the effect of halving the dynamic range that results from going to 8 bits.
16-bit resolution is the standard resolution for compact disc audio.
24-bit audio provides greater resolution and headroom and is used by many mastering systems.
32-bit floating point audio file resolution is an emerging standard used for high-end recording, mixing and mastering applications. Digital Performer's mix engine employs 32-bit floating point precision throughout, as do other advanced digital audio workstation systems. If you plan to use the bounced material with Digital Performer or another system that supports 32-bit floating point processing, this option is a good way to preserve and carry over the floating point precision employed by these systems.
Project Format will use the current project sample format.
Import: This option lets you choose what to do with the audio file(s) generated by the bounce operation. If you choose Do not import, the file will be created on the hard drive but it will not be imported into Digital Performer. Otherwise, you can import the audio file into the Soundbites window or into the current sequence as a new audio track. If you have chosen a format not supported by Digital Performer, you will not be allowed to choose either of these import options.
Source: Indicate the output or bus pair that you wish to capture in the bounce. All tracks that are currently selected and routed to — or bussed to — the source pair you choose will be included.
Additional options for all formats
File name: Type in the desired name for the resulting audio file(s). If multiple files are generated (due to a stereo or surround bounce operation), appropriate file extensions will be appended to the end of each file name to indicate its channel (.L, .R, etc.)
Save Settings for Bounce Again: When you check this box and click OK, you are asked to name your bounce settings and (optionally) assign them to a custom keyboard shortcut. All settings in the Bounce to Disk window are saved, including the destination folder. In addition, the current time range selection in the current DP project is also saved with the settings. This is important to understand because it means that saved bounce settings are bound to specific material in a specific project. They are not general in nature. This is very powerful, as it allows for you to take advantage of Digital Performer's Multi Bounce and other features in the Bounce Settings sub-menu (Audio menu).
Save Settings as Audio Export Format: When you check this box and click OK, you are asked to save the current audio export settings in the Bounce to Disk dialog. You can then conveniently recall them as a user preset when bouncing to disk or exporting audio. Your new audio export preset appears in all audio export format menus in Digital Performer, including the Bounce to Disk dialog and the audio export dialog. To use it, simply choose it from the menu when bouncing or exporting. These presets are saved as a preference, so they are not project-specific. They are global to all projects.
Destination: This displays the hard disk location for the resulting audio file(s) created by the bounce operation. Click the Choose button to change it.
Bouncing
After you've made the settings discussed above, click OK to begin the bounce. Digital Performer displays a progress window that shows the progress of the bounce operation.
Processing occurs faster than real time in most situations and there is therefore no playback during bouncing. The speed of the processing, however, not only depends on how fast your computer is, it also depends on how many tracks you have selected for bouncing. If what you have selected can be played by your computer, then processing during bouncing will probably occur faster than real time. If you have selected more tracks than you can play at one time, then processing speed may not necessarily occur faster than real time.
Bouncing to MP3
Digital Performer can export audio to the MP3 audio file format, either using the Bounce to Disk command or the Export Selected Bites command in the Soundbites window mini-menu. For details, refer to the Digital Performer User Guide.
Bouncing to a QuickTime Movie
You can bounce an audio output bundle (mono, stereo or any surround format), together with video, to a QuickTime movie file. This allows you to export a complete QuickTime movie from Digital Performer in one easy operation, complete with a sound track that you've created in DP.

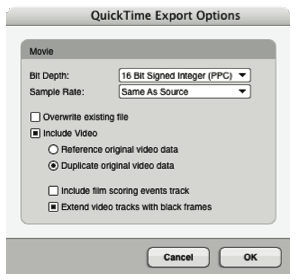
If you wish to include video in the resulting exported movie (instead of exporting only the audio), check the "Include Video" box. If you would like to reference the original source video data in this new exported movie (to conserve disk space, for example), choose "Reference original video data". If you would like to duplicate the original video data in the new exported movie, making it a complete, self-contained movie of its own, choose "Duplicate original video data".
If the audio starts before the source video begins or extends past where the source video ends, choose "Extend video tracks with black frames" to append the movie with video black so that the resulting movie matches the length of the audio. If you would prefer white video instead, uncheck this option.
Film Scoring Events can be included when you Bounce to Disk using the QuickTime Movie Export. To do so, make sure they are enabled in Digital Performer's preferences, and then enable the Include film scoring events Track option in the QuickTime Bounce Settings window as shown above. When checked, all currently visible (enabled) streamers, punches and flutters will be included in the resulting movie file. This includes the visual click, if enabled. Note that they must be enabled in the preferences and assigned to the QuickTime movie overlay to be included in the bounce. If not, this check box has no effect and they will not be included in the bounce.