Users of previous versions of Digital Performer
The locations of some buttons and controls have been moved in Digital Performer 6.0 and later. Refer to the following section for the location of these controls compared to previous versions of Digital Performer.
General conventions
| Feature | Window location in DP 5 & earlier | Window location in DP 6 & later |
|---|---|---|
| Mini-menu | upper left | upper right |
| Track selector show/hide | window title bar | bottom left; see also "Track Selector" in the Digital Performer User Guide |
| Zoom in/out | varied by window | bottom right corner |
| QuickFilter | upper left | lower left |
| Snap to Markers | upper right | Snap Info panel* |
| Snap to Beats | upper right | Snap Info panel* |
| Audible mode | window title bar | Control Panel |
| Solo mode | window title bar | Control Panel |
| Automatic Conversions on/off | window title bar | Preferences |
| Automation Snapshot | window title bar | lower left in Sequence Editor and Mixing Board; next to Preset menu in Effects window |
| V-Rack edit mode | window title bar | lower left corner |
| Window target | in the Consolidated Window: upper left; out of the Consolidated Window: Command-click upper right | Window Target tab in upper right |
* These items may also be shown in the Information Bar within an Edit window; for more details see Information bar, below.
Installed files
The Digital Performer application is now installed directly into the Applications folder. Also, the following items have been moved or removed:
- The “Clicks” and “Grooves” folders have moved to /Library/Application Support/MOTU/Digital Performer. Move any custom click or groove files from previous versions into these folders.
- Extras folder:
- Expansion Board Setup.app has been removed. To configure expansion boards for your MIDI devices, go to the Bundles window, select the MIDI Devices tab, and open the device’s Properties window to the Patches tab.
- FreeMIDI Converter.app is no longer included. Please use Audio MIDI Setup to configure your virtual studio manually.
- The “Use me to calibrate your audio” project is no longer included.
Collapsible title bars
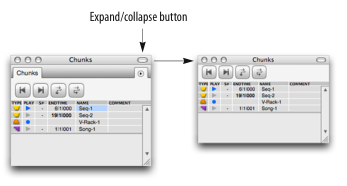
Window title bars may be collapsed or expanded using the oval button in the upper right:

When collapsed, Control-click the oval button to access the mini-menu, or Command-click to access the Window Target menu.
Control Panel
Several changes have been made in the Control Panel. Most notably, the drawers in the Control Panel have been removed. Those functions have either been added directly to the Control Panel or moved to other, more suitable locations.
Audio drawer
The Sample Rate and Clock Mode menus have been added to the Control Panel. The Hardware & Studio Settings buttons have been removed; those dialogs can be accessed via Setup menu > Configure Audio System.
Tempo Control
The tempo functions and Frame Rate menu have been added to the Control Panel. To set the Chunk Start, choose "Set Chunk Start Time" from the Sequence menu next to the sequence name in the Control Panel.
Selection drawer
The selection controls are now found in the Selection Information panel. Link Playback to Memory & Link Memory to Selection on/off have been added to the Control Panel; pre- and post-roll for Link Playback to Memory can be toggled on/off in the Control Panel, and their values can be set in the Selection Information panel (or by dragging their markers in an edit window).
Window Button drawer
This has been removed. Use the Shortcuts window, keyboard shortcuts, Consolidated Window tabs, or menus to open windows.
Other
- The Chunk control buttons (previous/next, Cueing, Chaining) have been moved to the Chunks window.
- The Counter display formats are now accessible from a drop-down menu next to each format, instead of clicking an icon repeatedly.
- The Position Bar has been removed.
Additions
Each counter has the option to display dashes when the transport is moving.
Consolidated Window
Many actions can now be accomplished by actions on the Consolidated Window itself, rather than with buttons. Keyboard shorcuts may also be used the same as they were in previous versions.
| Feature | DP 5 & earlier | DP 6 & later |
|---|---|---|
| show/hide sidebar | button in title bar | double-click divider |
| pop window in/out | button in title bar | double-click empty space in Tab bar |
| add cell or row | drag down from top | drag up from bottom |
| mini-menu for Consolidated Window | button in title bar | removed (use Window menu) |
| resize Consolidated Window | bottom right of cell in lower right corner | lower right corner of Consolidated Window itself |
The following features have been added to the Consolidated window:
-
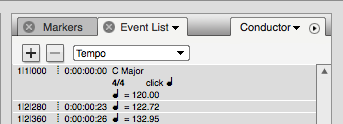
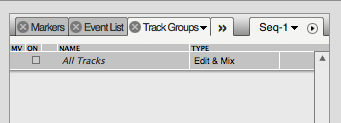
You can have multiple tabs within a single sidebar cell.

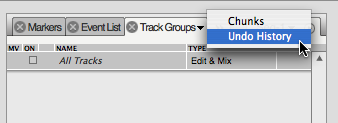
Choose "Add Tab" from the sidebar window list, or hold the option key while selecting a window from the window list. If there’s not enough space to display all of the tabs in the cell, a tab with a double chevron on it will appear; click on that tab for a pop-up menu of the tabs which are not visible.


- Command-clicking on a window name in the Consolidated Window body closes all other rows in the body; likewise, Command-clicking a window name in the Consolidated Window sidebar closes all other rows in that sidebar (other tabs within that cell remain open). This works even when the tab you are Command-clicking is already selected.
- When there are multiple windows tabbed within a sidebar cell, Option-clicking the close button of a tab will close all other tabs in that cell; other cells in that sidebar are not affected.
Tracks Window
The Selection controls have been removed; use Selection Info panel or add the Selection section to the Information bar. The following features have been added to the Tracks window:
- Vertical resizing — you can now zoom in vertically as well as horizontally.
- You can now grab anywhere along the divider between the Track List and the Tracks Overview to move it.
Information Bar
The Information Bar (previously referred to as the Event Info bar) found in the Edit windows can now configured to display only the information you want. Additionally, there are four dedicated information windows that always show all of the information: Snap Information, Cursor Information, Selection Information, and Event Information. See the “Information Windows” chapter in the Digital Performer User Guide for more details.
Audio Unit ramp automation support
Digital Performer 6.0 and later supports ramp automation with Audio Unit plug-ins. If you open a DP project created in an earlier version of DP, and the project contains "stair-stepped" automation that prescribes a ramp, the automation will be converted into a ramp when you first open the project. If, for some reason, a situation calls for stair stepping, but the data has been converted into a ramp, you can convert it back into stair steps using the Change Continuous Data command. See "Change Continuous Data" in the Digital Performer User Guide.
Any Audio Unit automation data that you create in Digital Performer 6.0 and later will be inserted as a ramp automation. You can control the default density of the data that constitutes a ramp via settings in the Automation Setup window.