Snap Information
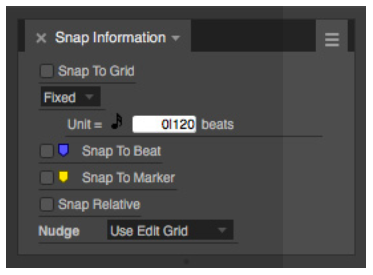
The Snap Information window contains information pertaining to snapping and nudging.

The Snap to Grid feature can be enabled or disabled with the check box provided. If the Snap to Grid box is turned on, data snaps to the edit grid. If it is turned off, data doesn’t snap to grid. Choose the desired Snap to Grid mode from the menu (see above image): Fixed or Auto.

Auto mode
In Auto mode, Digital Performer chooses a reasonable grid size, based on the time format of the time line and the zoom level of the edit window you are working in. For example, if you are zoomed in quite a bit for detailed editing, the Auto grid might snap to 32nd notes. If you zoom out, it will snap to 16th or 8th notes.
Fixed mode
In Fixed mode, the Unit = (also known as the Edit Grid Resolution) setting determines the minimum time unit for editing, which is shown as a note duration and a number of beats and ticks, such as 240 ticks. The Edit Grid Resolution (Unit =) determines the amount of time between grid points. MIDI events, note durations, soundbites, loops, region boundaries, automation data, Memory Cycle repeat barlines, or any event that can be dragged horizontally will snap to time increments in the time line equal to the value of the edit grid unit. For example, if the Unit is set to 120 ticks, events will snap to 000, 120, 240 and 360 ticks.
Using Snap to Grid
Press the D key on your keyboard to toggle quickly between Fixed and Auto modes.
Snap to Grid’s on/off state, the edit grid resolution and Snap Relative’s on/off state can be set independently for each edit window. However:
- It does not affect the Event List
- You can change the Edit Grid Resolution in the Drum Editor, but because of its grid-based display, Snap to Grid is always enabled.
If you wish to maintain an event’s original, unquantized position relative to the time line’s absolute grid, use the Snap Relative option.
Snap Relative
When Snap Relative is checked, an event moves relative to its original position, rather than snapping to the time line’s absolute grid. For example, if the grid unit is set to 120 ticks, and the original event is located at 013 ticks, it will snap to 133, 253, and 373 (which are all 13 ticks after 000, 120, 240 and 360).
Setting the Edit Grid Resolution
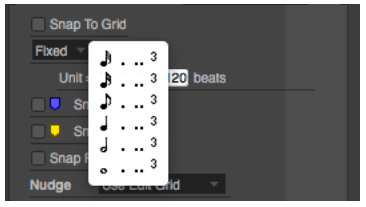
To change the Edit Grid Resolution, first make sure that Fixed mode is chosen from the menu and then use the value field provided to type in the desired grid duration, or choose a preset length from the Unit= menu.
When you type in a value, the note displayed next to the ticks box will grey out (or text will be displayed in italics) if the tick value does not equal one of the presets in the menu.
Triplet and dotted triplet grid editing
The edit grid menu also provides choices for triplet and dotted triplet values

Edit grid supports all time formats
The Time Format command (Setup menu) lets you choose any time format you wish for the edit grid (measures, frames, real time or samples). For example, if you choose SMPTE frames as the global time format, the Edit Grid switches to frame time, and grid editing can be done at SMPTE time code increments such as one frame, 10 frames, etc. A significant by-product of this feature is that the real-time grid, SMPTE frame grid and sample edit grid preserve the real-time relationship of events with respect to each other during edits. For example, if you move several sound effects events to a location in the sequence that is at a different tempo, their spacing with respect to one another will not expand or contract due to the different tempo; instead, their relation to one another will be maintained. This is similar to the editing behavior in locked tracks.
When the edit grid is set to any time format other than measures and beats, the Smart Selections feature (Edit menu), which provides assisted measure- and beat-relative editing operations, is automatically disabled (since you have no measures or beats to refer to during edits).
Snap to Grid and selecting
Snap to Grid applies to selection, too, so it is an effective way to constrain selection operations.
Edit resolution when the grid is turned off
When Snap to Grid is turned off, data can be dragged freely. The smallest unit of resolution is one screen pixel, the exact resolution of which is determined by the current zoom level.
Temporarily overriding Snap to Grid
The Command/Ctrl key temporarily overrides the current Snap to Grid enable/disable state. For example, if Snap to Grid is currently enabled, the holding down the Command/Ctrl key while dragging overrides the current edit grid. Conversely, if Snap to Grid is currently disabled, the Command/Ctrl key forces dragging to snap to the current Snap to Grid grid setting. The same is true for selection operations.
Don't let the edit grid fool you
When you zoom in, the edit grid (in Fixed mode) may cause data to seem like it is “stuck”; that is, data will not move when you try to drag it. This is because the fixed-size edit grid is larger than the distance you are dragging. To “unstick” the data, deselect the Snap to Grid check box, or hold down the Command/Ctrl key while dragging. Doing so overridestheeditgridtemporarily.Alternately,you can use “Auto mode”
Snap to Grid and nudging with the arrow keys
Snap to Grid only affects dragging operations. It is independent of nudging data with the arrow keys (except when Nudge is set to Use Edit Grid – see “Nudge” below).
Displaying edit grid lines
You can display lines extending downwards from the time ruler through the data grid to indicate the current edit grid. To toggle this option on or off, go to Preferences > Edit Windows.
Snap to Beat snaps actions to the beats within the waveform. This is active only when in the Sequence Editor or Waveform Editor.
Using the Beat Grid
Editing to the Beat Grid is different than editing to the time ruler Edit Grid. With the Edit Grid, your actions snap to the specified beat resolution at regularly spaced intervals that are prescribed by Digital Performer’s time ruler. But with the Beat Grid, your actions snap to actual beats within the waveform, as specified by the beat locations in the waveform, even if they don’t match up with beats in the time ruler.
Essentially, the Beat Grid allows you to edit to the audio data, instead of to the project’s time ruler. This is very powerful, especially when making edits that must remain faithful to the feel or “groove” of the audio, as this would not be reflected in the time ruler grid. Further, Digital Performer’s Beat Detection Engine goes to great lengths to place beats at exact transient onsets, usually down to the sample. This makes beat editing extremely accurate.
Beat Grid snapping works similarly to marker snapping: when you drag close to a beat, it snaps. But if you are not close to a beat, it won’t snap.
The Beat Grid can be enabled with the Snap to Beats checkbox in the Snap Information window, and can be used in the Waveform Editor or the Sequence Editor. In the Sequence Editor, you can extend the selection across multiple audio tracks. In this case, your actions snap to the beats in the track under the cursor, so move the cursor over the track that contains the beat you wish to snap to.
If the Beat Grid is currently turned on, hold down the Command/Ctrl key to temporarily turn it off.
You can enable the Edit Grid, the Beat Grid and marker snapping at the same time, if you wish. In this case, your actions will snap to all three.
When Snap to Markers is checked, dragged events snap to markers. The edges of soundbites and MIDI notes dragged close to a marker location also snap to the marker’s time. For example, the left edge or right edge of a soundbite or MIDI note will snap. Snapping also occurs when spotting soundbites by dragging them from the Soundbites window into the Sequence Editor.
Hold down the Command/Ctrl key to toggle the current setting.
Marker Grid Lines
The Show marker grid lines Edit Window preference (Digital Performer menu > Preferences > Edit Windows) toggles the appearance of a yellow line that extends downwards from each marker through the note grid, median strip and continuous data grid. You might find it helpful to turn off the Edit Grid and show marker grid lines. Marker snapping is not affected by the display of marker grid lines: they can be shown or hidden and snapping will still occur (when it is turned on).
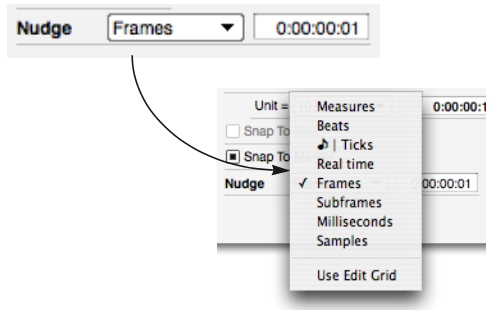
The Nudge amount lets you to choose the unit of time by which you can nudge any selected data with the arrow keys. Many different time formats are supported, including SMPTE frames, SMPTE sub-frames, samples, and milliseconds. Choose the desired time format from the menu and then enter the amount of time. You can change the nudge amount at any time.

When you choose a mensural time format (one that involves measures, beats and/or ticks), data is nudged in the same manner as using the Shift command (Edit menu) with the Preserve Real-time Performance option unchecked. This means that the data being nudged maintains its metrical relationship to the sequence, changing the way it plays back, if necessary, to respect any tempo changes that may be programmed in the conductor track in the area in which the data is being nudged.
When you choose any other time format (real time, SMPTE frames, sub-frames, milliseconds, or samples), the real time performance of the data is preserved, regardless of any tempo changes.
When you choose the Use Edit Grid menu item, the nudge amount is determined by the edit grid setting above. If the edit grid is currently disabled, then nudging occurs in the same manner as in the window itself (by one screen pixel). In the Tracks window, the column duration determines the nudge amount.