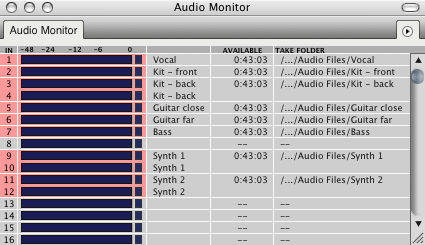
Audio Monitor
The Audio Monitor (Studio menu) displays important information about the recording settings for each digital audio input.

Input (IN): the leftmost column in the Audio Monitor indicates each audio input provided by your hardware.
Level meters: The level meters work like a standard VU meter on a mixing console. They indicate the amplitude of audio being recorded on each input. The meters in the Audio Monitor show input levels only. Playback levels are displayed in the level meters in the Mixing Board window. The Level Range mini-menu command allows you to change the range of the meters from 6 dB to 42 dB.
Takefiles: The Takefile column displays the name of the audio file that will contain the next portion of audio to be recorded on each input. As soon as you record-enable an audio track, Digital Performer automatically creates an audio file with a name that matches the name of the track being recorded into, followed by a take number (e.g. Guitar-3). These automatically generated audio files are referred to as takefiles. Here's a brief summary of what you can do with takefile names:
- To rename the takefile, uncheck the mini-menu option called 'Base file names on track names' and then Option-click the takefile name.
- To relocate the takefile, double-click.
- To select one or more takefiles for mini-menu commands, click (or Shift-click).
Available record time: displays the total amount of time available for recording on the hard disk where the take file is currently located. Time is displayed in minutes and seconds. Click the value to toggle between minutes:seconds and megabytes (MB). Option-click to toggle all inputs at once. One minute of 16 bit, 44.1 kHz takes up about 5 MB of hard disk space.
Take Folder: Displays the current location on disk of the takefile. Click to toggle the display between showing the full path name and the abbreviated path name.
Mini-menu quick reference
Set Take Folder: lets you change the location of the currently selected takefile(s) in the Audio Monitor window. Click, Shift-click, or use Select All to highlight the take file names before choosing this command.
Level Range: lets you choose among several different level ranges for the meters in the Audio Monitor, from 6 dB to 42 dB.
Base file names on track names: when checked, this command causes takefile names to be derived from the name of the track currently being recorded into. For example, When this option is checked, and the currently record-enabled track is named Guitar, the takefile name will be called Guitar-x, where x is a take number automatically assigned by Digital Performer.
Retain Clip: when checked, this command causes the clip indicators to remain lit after clipping has occurred (instead of only remaining lit as clipping occurs). Click the clip indicator to turn it off.
Scroll to Record Enabled Inputs: When checked, the Audio Monitor will automatically scroll to the record-enabled input(s).